Just some pictures…


Just some pictures…
Da ich immer wieder so viele falsche Informationen über ZRAM sehe habe ich beschlossen mal etwas Klarheit in die ganze Materie zu bringen 
Oft wird über einen Performance Vorteil gesprochen, da ZRAM schneller als Swap ist. Das ganze mag für normale PCs stimmen aber wir sind hier mit Android unterwegs und da sieht das ganze etwas anders aus!
Erst einmal eine kurze Feststellung für alle, die noch nicht so lange in der Android Szene unterwegs sind:
ZRAM = ramzswap = Compcache
Um ZRAM genauer zu erklären müssen erstmal andere Begriffe genauer geklärt werden:
Swap kann man mit der Auslagerungsdatei unter Windows vergleichen werden. Wird der Arbeitsspeicher (RAM) zu voll kann der PC die Daten, die gerade nicht aktiv gebraucht werden (z.B. Hintergrundanwendungen) auslagern um so wieder RAM frei zu räumen. Dazu werden diese Daten auf eine Festplatte geschrieben. Bei Bedarf können diese Daten dann einfach wieder von dort aus gelesen werden. Selbst die schnellste SSD ist aber langsamer als der Arbeitsspeicher. Unter Android gibt es Swap nicht!
Bei ZRAM werden nicht benötigte Speicherressourcen komprimiert und dann in einen fest reservierten Bereich im RAM verschoben (ZRAM). Also eine Art Swap Partition im Arbeitsspeicher.
Dadurch ist mehr Ram frei, da die Daten dann nur noch ca. 1/4 des ehemaligen Speicherbedarfs haben. Allerdings muss die CPU dadurch mehr arbeiten, da sie die Daten komprimieren muss (oder auch wieder entpacken wenn sie wieder gebraucht werden). Der Vorteil hierbei liegt ganz klar in der Geschwindigkeit. Da die Swap Partition sich im RAM befindet ist diese viel schneller als eine Swap Partition auf einer Festplatte.
An und für sich eine ganz tolle Sache. Aber Android besitzt keine Swap Partition und daher bringt ZRAM unter Android keinen Performance Gewinn wie es bei einem normalen PC der Fall wäre.
Beim normalen PC würde das folgendermaßen aussehen:
Swap = Auslagerungsdatei (auf Festplatte) –> Langsam
ZRAM (Swap im RAM) –> Schneller als Swap
RAM –> Schnell
Bei Android gibt es keine Swap Partition und daher bringt ZRAM auch keinen Performance Boost.
Das einzige was ZRAM bringt ist “mehr” RAM. Durch das komprimieren “vergrößert” sich sozusagen der verfügbare Arbeitsspeicher. Das ist auf Geräten mit sehr wenig RAM (<256MB) auch ziemlich nützlich. Das S2 hat aber 1GB und die reichen mehr als aus. Da muss nicht künstlich auf 1,5GB hochgepusht werden.
Denn aktiviert man ZRAM hat das auch 2 Nachteile. Das komprimieren und dekomprimieren verbraucht CPU Time, welche wiederum höheren Stromverbrauch zur Folge hat.
Grob kann man also sagen (Für Geräte mit mehr als 512MB RAM):
Ohne ZRAM: +CPU Performance | +Battery | -RAM
Mit ZRAM: -CPU Performance | -Battery | +RAM
Für Geräte mit zu wenig RAM also durchaus sinnvoll. Aber wer ballert beim S2 schon sein kompletten RAM voll und braucht dann immer noch mehr?
Überprüfen ob ZRAM läuft kann man im Terminal mit
free oder cat /proc/meminfo
ZRAM aus:


ZRAM an:


Weiterführende Infos:
Swap and Compcache – CyanogenMod Wiki
Some weeks ago I’ve ordered a so called “Plug Computer”.
These Computers are very small devices with an ARM SoC.
They are pretty cheap! I’ve got my PogoplugV2 for 10€ 
I was lucky and got the gray version 
Some device info:
Pretty great to use this device as a small homeserver/fileserver. Remember 10€!
I want to use my Pogoplug as a fileserver (for Windows PCs) and DLNA server to stream to my TV.
On top of that maybe some additional stuff in the feature 
But the default software sucks. No Samba support, no DLNA, no FTP, …
But this doesn’t matter because there is an Arch Linux for ARM Port.
This is an instruction how to install Arch Linux on a PogoplugV2.
Everything after the Arch Linux installation (Install Webmin, Samba, DLNA, …) can be used for all devices which run Arch Linux for ARM.
Prepare device and install Arch Linux

Everything we have to do to install Arch Linux are 4 steps.
An instruction how to do that is available here: http://archlinuxarm.org/platforms/armv5/pogoplug-v2-pinkgray
There are instuctions for other devices as well.
If you use Windows use PuTTY as a SSH client.
Use PuTTY or another SSH client to access your Pogoplug.
username: root
password: root
First you should change your root password.
Use the following command to do so:
passwd root
Arch Linux has an own package manager called pacman.
With pacman you can install/remove packages and update Arch Linux.
To update Arch Linux use the following command:
pacman -Syu
Note: For GUI lovers: skip this step and set hostname and timezone in the webmin interface (next step)
The default hostname is “alarm”. Let’s change it!
hostnamectl set-hostname myhostname
To get all available timezones use:
timedatectl list-timezones
And to set your timezone:
timedatectl set-timezone <Zone>/<SubZone>
For example:
timedatectl set-timezone Europe/Berlin
Now reboot:
reboot
Wait a few seconds and reconnect to SSH.
Webmin is a pretty cool web-based interface for system administration.
It’s easy to use and will help you to configure stuff faster.
To install it use:
pacman -Sy webmin perl-net-ssleay
Now we have to allow access from more IP addresses.
You have to edit the configuration file.
nano /etc/webmin/miniserv.conf
Find the following line: allow=127.0.0.1
Now add a new allow line with your local network broadcast ip or a specific ip and save the file.
For example:
allow=127.0.0.1 ## Allow local access
allow=192.168.0.0 ## Allows all users from 192.168.0.1 - 192.168.0.255
Now we’ll enable & start the webmin service so it autostarts.
systemctl enable webmin
systemctl start webmin
To access the Webmin interface open a browser and go to:
https://deviceip:10000
To lower memory usage go to:
Webmin>Webmin Configuration>Advanced Configuration and disable “Pre-load Webmin functions library?”
If you want to remove your USB HDD and use it anywhere else it would be cool to have automounting like Windows.
There are a lot of auto mounting mechanisms for Arch Linux but a lot of them are outdated.
This one is using udevil to auto mount all USB HDDs on attach as /media/PARTITION_LABEL. So make sure all partitions have a label!
pacman -Sy udevil
I want to access my HDDs via Samba to use them in Windows so I have to use either FAT32 or NTFS.
This sucks because FAT32 isn’t able to handle files >4GB so it’s useless.
And NTFS is fucking slow on Linux.
But with some special mount options we are able to increase the speed dramatically!
I’ve did some benchmarks with hdparm and dd before and after the optimization.
The read speed was pretty good already (about 29MB/s –> USB 2.0 limit).
But the write speed was really bad!
Before: ~6,5 MB/s write speed
After: ~28,5 MB/s write speed
As you can see the write speed on NTFS was really slow before. But there is a way to fix it
We have to edit the mount options and add a special ntfs-3g option to our udevil automount settings.
Open the udevil config file and edit it:
nano /etc/udevil/udevil.conf
Search for default_options_ntfs= and allowed_options=
Now we add the option “big_writes” to both lines so it looks like:
..., noatime, big_writes, uid=...
Save the file.
Create the /media directory
mkdir /media
Add the udevil service to autostart.
systemctl enable devmon@root
Let’s reboot to see whether it works
reboot
Wait a few seconds and reconnect to SSH.
Now you’ll have a new folder: /media/yourHDDname where your HDD is mounted.
And you should see something like /dev/sdX1 on /media/… if you type:
mount
Note: All USB HDDs should go to standby automatically.
You can check with:
hdparm -C /dev/sda
7. Blink LED to HDD activity
The PogoplugV2 has a green and orange LED.
So I thought it would be a cool idea change the color to HDD activity.
I’ve created an systemd service.
———————————
Only If you have a PogoplugV2!
You have to correct your arcNumber and matchid because there is a bug in the current uboot and your Pogoplug isn’t detected as a PogoplugV2.
pacman -Sy uboot-env
fw_setenv arcNumber 3542
fw_setenv machid dd6
reboot
———————————
We need the iostat binary to create our own deamon.
Iostat will check hdd activity.
pacman -Sy sysstat
Create a new file called /usr/lib/systemd/system/blinkled.service with the following content:
[Unit]
Description=Blink LED if hard drive is active daemon

[Service]
Type=oneshot
ExecStart=/usr/local/bin/blinkled
ExecStop=/usr/bin/killall iostat
RemainAfterExit=true

[Install]
WantedBy=multi-user.target
Create another file called /usr/local/bin/blinkled
This command is pretty long It will execute iostat every 3 seconds. If there is HDD activity the Pogoplug will start to blink orange.
You can change heartbeat to default-on or timer as well.
#!/bin/bash
/usr/bin/iostat -z -d 3 | /usr/bin/sed -u -e '1d' -e 's/Device.*/none/' -e 's/sd.*/heartbeat/' -e '/^$/d' > /sys/class/leds/status:orange:fault/trigger &
And make it executable
chmod u+x /usr/local/bin/blinkled
To start our service use:
systemctl start blinkled
To autostart use:
systemctl enable blinkled
Warning: This specific instruction works for PogoplugV2 only!
You can brick your device!
The current kernel for PogoplugV2 is 3.1.x but 3.8.x or newer is available.
You have to update manually because newer kernels need a new uboot.
You need the newest uboot to boot Kernels >3.2 so you have to install it before:
If this is a fresh installation you probably have the newest uboot already and you don’t have to do that!
cd /tmp
wget http://jeff.doozan.com/debian/uboot/install_uboot_mtd0.sh
chmod +x install_uboot_mtd0.sh
./install_uboot_mtd0.sh
Then you have to correct your arcNumber and matchid if you didn’t follow “Blink LED to HDD activity”.
pacman -Sy uboot-env
fw_setenv arcNumber 3542
fw_setenv machid dd6
reboot
Now you can install the new Kernel files with:
pacman -Sy linux-kirkwood linux-headers-kirkwood
reboot
Install MiniDLNA and enable the service.
pacman -Sy minidlna
systemctl enable minidlna
Now edit the config file
nano /etc/minidlna.conf
It’s pretty easy to understand the config file and the documentation is well.
You have to set at least one media_dir
All USB devices are mounted at /media/DEVICE_LABEL
For example:
media_dir=V,/media/zincobi/Videos
Here are some additional options you could set:
friendly_name=POGOPLUG DLNA Server
db_dir=/var/cache/minidlna
log_dir=/var/log
presentation_url=http://YOUR_DEVICE_IP_HERE:8200/
MiniDLNA will update the DB automatically.
If you have a lot of files (>8192) you should increase your max inotify value for a single user so MiniDLNA can watch all files.
Create /etc/sysctl.d/90-inotify.conf and insert the following:
# Increase inotify max watchs per user for local minidlna
fs.inotify.max_user_watches = 100000
MiniDLNA is able to use thumbnails or cover images.
I’ve created a small bash script which will generate thumbnails for videos recursively.
You need ffmpegthumbnailer to create these thumbnails.
pacman -Sy ffmpegthumbnailer
Let’s create the script:
nano /usr/local/bin/generateThumbs.sh
This script will generate a thumbnails for every video file recursively.
You can add even more extensions to the TYPES array.
#!/bin/bash

DIR=$1

if [ -z "$DIR" ]; then
	printf "%sn" "This script will generate thumbnails for all video files inside the given directory"
	printf "%sn" "moviexy.avi --> moviexy.jpg"
	printf "%sn" "ffmpegthumbnailer is required"
	printf "%sn" "Usage: generateThumbs "
	exit 1
fi

TYPES=( mov mp4 avi mkv m4v xvid divx wmv mpg mpeg )

# Create a regex of the extensions for the find command
TYPES_RE="\("${TYPES[1]}
for t in "${TYPES[@]:1:${#TYPES[*]}}"; do
    TYPES_RE="${TYPES_RE}\|${t}"
done
TYPES_RE="${TYPES_RE}\)"

find "$DIR" -regex ".*.${TYPES_RE}" -type f | while read -r FILEPATH
do
	printf "%sn" "--- Start Thumbnailcreation for ---"
	printf "%sn" "$FILEPATH"
	THUMBFILE="${FILEPATH%.*}.jpg" # remove video ext. and add .jpg
	if [ -f "$THUMBFILE" ]; then
		printf "e[1;33m%se[0mn" "Thumbnail exists"
	else
		printf "e[1;32m%se[0mn" "Generating thumbnail..."
		ffmpegthumbnailer -i "$FILEPATH" -o "$THUMBFILE" -s 160 -q 10
	fi
	printf "%sn" "--- End Thumbnailcreation ---"
done
exit 0
See: https://github.com/Obihoernchen/generateThumbs
Make it executable:
chmod u+x /usr/local/bin/generateThumbs.sh
Execute it with something like:
generateThumbs.sh /media/YOURDEVICELABEL/Videos
Now start MiniDLNA
systemctl start minidlna
Be careful you can mess up your whole network connection!
I don’t like dynamic IP addresses in my LAN. Especially for servers.
They should have a static IP like every server. Of course there are hostnames but not all devices are able to resolve them.
Arch uses netcfg to configure your network adapters. You can create multiple profile.
To create a new static ip profile create a new profile in /etc/network.d/ named wired-static-eth0
nano /etc/network.d/wired-static-eth0
And add the following content, replace everything with your values and save the file.
Note: I use custom DNS settings because my router doesn’t allow me to edit DNS settings.
CONNECTION='ethernet'
DESCRIPTION='A basic static ethernet connection using iproute'
INTERFACE='eth0'
IP='static'

#IP of your pogoplug
ADDR='192.168.0.2'

#ROUTES=('192.168.0.0/24 via 192.168.1.2')

#Gateway (For example your router)
GATEWAY='192.168.0.1'

#DNS set to ('Gateway IP') if you want to use the DNS your router provides
DNS=('8.8.8.8' '8.8.4.4')

## For IPv6 autoconfiguration
#IP6=stateless
## For IPv6 static address configuration
#IP6='static'
#ADDR6=('1234:5678:9abc:def::1/64' '1234:3456::123/96')
#ROUTES6=('abcd::1234')
#GATEWAY6='1234:0:123::abcd'
Now you need to change the default network profile to the new one.
nano /etc/conf.d/netcfg
Find NETWORKS= and edit it:
NETWORKS=(wired-static-eth0)
You have to be sure that everything is correct otherwise you are going to loose network connection and have to edit all files from your USB stick with another PC.
Just restart the netcfg service or restart to apply the new settings
systemctl restart netcfg
The current terminal doesn’t look that nice. Everything is white and boring…
But we can change this so your terminal will look like this:

Just replace /etc/bash.bashrc with the following content:
# /etc/bash.bashrc
#
# https://wiki.archlinux.org/index.php/Color_Bash_Prompt
#
# This file is sourced by all *interactive* bash shells on startup,
# including some apparently interactive shells such as scp and rcp
# that can't tolerate any output. So make sure this doesn't display
# anything or bad things will happen !

# Test for an interactive shell. There is no need to set anything
# past this point for scp and rcp, and it's important to refrain from
# outputting anything in those cases.

# If not running interactively, don't do anything!
[[ $- != *i* ]] && return

# Bash won't get SIGWINCH if another process is in the foreground.
# Enable checkwinsize so that bash will check the terminal size when
# it regains control.
# http://cnswww.cns.cwru.edu/~chet/bash/FAQ (E11)
shopt -s checkwinsize

# Enable history appending instead of overwriting.
shopt -s histappend

case ${TERM} in
        xterm*|rxvt*|Eterm|aterm|kterm|gnome*)
                PROMPT_COMMAND=${PROMPT_COMMAND:+$PROMPT_COMMAND; }'printf "\033]0;%s@%s:%s\007" "${USER}" "${HOSTNAME%%.*}" "${PWD/#$HOME/~}"'
                ;;
        screen)
                PROMPT_COMMAND=${PROMPT_COMMAND:+$PROMPT_COMMAND; }'printf "\033_%s@%s:%s\033\\" "${USER}" "${HOSTNAME%%.*}" "${PWD/#$HOME/~}"'
                ;;
esac

# fortune is a simple program that displays a pseudorandom message
# from a database of quotations at logon and/or logout.
# Type: "pacman -S fortune-mod" to install it, then uncomment the
# following line:

# [[ "$PS1" ]] && /usr/bin/fortune

# Welcome Message
# Arch Linux Logo Welcome Message
c1="$(tput sgr0)$(tput setaf 4)"
c2="$(tput bold)$(tput setaf 4)"
c3="$(tput bold)$(tput setaf 0)"
echo
echo "        $c2,$c1                       _     _ _"
echo "       $c2/$c1#$c2\\$c1        __ _ _ __ ___| |__ | (_)_ __  _   ___  __"
echo "      $c2/$c1###$c2\\$c1      / _` | '__/ __| '_ \\| | | '_ \\| | | \\ \\/ /"
echo "     $c2/$c1#####$c2\\$c1    | (_| | | | (__| | | | | | | | | |_| |>  <"
echo "    $c2/$c1##,-,##$c2\\$c1    \\__,_|_|  \\___|_| |_|_|_|_| |_|\\__,_/_/\\_\\"
echo "   $c2/$c1##(   )##$c2\\$c1"
echo "  $c2/$c1#.--   --.#$c2\\  $c3 A simple, elegant GNU/Linux distribution."
echo " $c2/$c1`           `$c2\\$(tput sgr0)"$'\n'

# Show date
DATE="$(tput setaf 1)[$(tput setaf 6)$(date)"
DATE="${DATE}$(tput setaf 1)]"
echo $DATE
# Show kernel info
KERNEL="$(tput setaf 1)[$(tput setaf 6)$(uname -srmn)"
KERNEL="${KERNEL}$(tput setaf 1)]"
echo "$KERNEL"$'\n'
# Reset colors
tput sgr0

# Set colorful PS1 only on colorful terminals.
# dircolors --print-database uses its own built-in database
# instead of using /etc/DIR_COLORS. Try to use the external file
# first to take advantage of user additions. Use internal bash
# globbing instead of external grep binary.

# sanitize TERM:
safe_term=${TERM//[^[:alnum:]]/?}
match_lhs=""

[[ -f ~/.dir_colors ]] && match_lhs="${match_lhs}$(<~/.dir_colors)"
[[ -f /etc/DIR_COLORS ]] && match_lhs="${match_lhs}$(</etc/DIR_COLORS)"
[[ -z ${match_lhs} ]] \
        && type -P dircolors >/dev/null \
        && match_lhs=$(dircolors --print-database)

if [[ $'\n'${match_lhs} == *$'\n'"TERM "${safe_term}* ]] ; then

        # we have colors <img src="http://obihoernchen.net/wordpress/wp-includes/images/smilies/icon_smile.gif" alt=":-)" class="wp-smiley">

        # Enable colors for ls, etc. Prefer ~/.dir_colors
        if type -P dircolors >/dev/null ; then
                if [[ -f ~/.dir_colors ]] ; then
                        eval $(dircolors -b ~/.dir_colors)
                elif [[ -f /etc/DIR_COLORS ]] ; then
                        eval $(dircolors -b /etc/DIR_COLORS)
                fi
        fi

        # -- CUSTOM PS1 String START --

        PS1="\$? \$(if [[ \$? == 0 ]]; then echo \"\[\033[01;32m\]\342\234\223\"; else echo \"\[\033[01;31m\]\342\234\227\"; fi) $(if [[ ${EUID} == 0 ]]; then echo '\[\033[01;31m\]\h'; else echo '\[\033[01;32m\]\u@\h'; fi)\[\033[01;34m\] \w \$\[\033[00m\] "
        #PS1="\[\033[0;37m\]\342\224\214\342\224\200\$([[ \$? != 0 ]] && echo \"[\[\033[0;31m\]\342\234\227\[\033[0;37m\]]\342\224\200\")[$(if [[ ${EUID} == 0 ]]; then echo '\[\033[0;31m\]\u\[\033[0;37m\]@\[\033[0;96m\]\h'; else echo '\[\033[0;33m\]\u\[\033[0;37m\]@\[\033[0;96m\]\h'; fi)\[\033[0;37m\]]\342\224\200[\[\033[0;32m\]\w\[\033[0;37m\]]\n\[\033[0;37m\]\342\224\224\342\224\200\342\224\200\076 \[\033[0m\]"
        # --- Custom PS1 String END ---

        # Use this other PS1 string if you want \W for root and \w for all other users:
        # PS1="$(if [[ ${EUID} == 0 ]]; then echo '\[\033[01;31m\]\h\[\033[01;34m\] \W'; else echo '\[\033[01;32m\]\u@\h\[\033[01;34m\] \w'; fi) \$([[ \$? != 0 ]] && echo \"\[\033[01;31m\]:(\[\033[01;34m\] \")\$\[\033[00m\] "

        alias ls="ls --color=auto"
        alias dir="dir --color=auto"
        alias grep="grep --colour=auto"
        alias dmesg='dmesg --color'
        man() {
            env LESS_TERMCAP_mb=$'\E[01;31m' \
            LESS_TERMCAP_md=$'\E[01;38;5;74m' \
            LESS_TERMCAP_me=$'\E[0m' \
            LESS_TERMCAP_se=$'\E[0m' \
            LESS_TERMCAP_so=$'\E[38;5;246m' \
            LESS_TERMCAP_ue=$'\E[0m' \
            LESS_TERMCAP_us=$'\E[04;38;5;146m' \
            man "$@"
        }

        # Uncomment the "Color" line in /etc/pacman.conf instead of uncommenting the following line...!

        # alias pacman="pacman --color=auto"
else

        # show root@ when we do not have colors

        PS1="\u@\h \w \$([[ \$? != 0 ]] && echo \":( \")\$ "

        # Use this other PS1 string if you want \W for root and \w for all other users:
        # PS1="\u@\h $(if [[ ${EUID} == 0 ]]; then echo '\W'; else echo '\w'; fi) \$([[ \$? != 0 ]] && echo \":( \")\$ "

fi

PS2="> "
PS3="> "
PS4="+ "

# Try to keep environment pollution down, EPA loves us.
unset safe_term match_lhs

# Try to enable the auto-completion (type: "pacman -S bash-completion" to install it).
[ -r /usr/share/bash-completion/bash_completion ] && . /usr/share/bash-completion/bash_completion

# Try to enable the "Command not found" hook ("pacman -S pkgfile" to install it).
# See also: https://wiki.archlinux.org/index.php/Bash#The_.22command_not_found.22_hook
[ -r /usr/share/doc/pkgfile/command-not-found.bash ] && . /usr/share/doc/pkgfile/command-not-found.bash
More information and other examples: https://wiki.archlinux.org/index.php/Color_Bash_Prompt
To search for available packages in repos if your command doesn’t exist on your current system configuration install pkgfile
pacman -Sy pkgfile
pkgfile --update
Flash drives have limited number of write cycles and default linux logging will write pretty much so your USB will be destroyed pretty fast.
That’s why a swap file on your USB stick is a really bad idea!
But you can disable some logging to extend the liefetime of your USB stick.
Just edit syslog-ng.conf and disable some of the “log { source(src); filter…” lines at the end of the file.
You can comment out (add a “#” in front of the line) all lines if you want to disable everything.
nano /etc/syslog-ng/syslog-ng.conf
I’ve disabled some of them. That’s my example:
# Disable some logging
#log { source(src); filter(f_acpid); destination(d_acpid); };
log { source(src); filter(f_authpriv); destination(d_authlog); };
#log { source(src); filter(f_syslog); destination(d_syslog); };
#log { source(src); filter(f_cron); destination(d_cron); };
#log { source(src); filter(f_daemon); destination(d_daemon); };
#log { source(src); filter(f_kernel); destination(d_kernel); };
#log { source(src); filter(f_lpr); destination(d_lpr); };
#log { source(src); filter(f_mail); destination(d_mail); };
#log { source(src); filter(f_news); destination(d_news); };
#log { source(src); filter(f_ppp); destination(d_ppp); };
log { source(src); filter(f_user); destination(d_user); };
#log { source(src); filter(f_uucp); destination(d_uucp); };
#log { source(src); filter(f_debug); destination(d_debug); };
#log { source(src); filter(f_messages); destination(d_messages); };
log { source(src); filter(f_err); destination(d_errors); };
log { source(src); filter(f_emergency); destination(d_console); };
#log { source(src); filter(f_everything); destination(d_everything); };
#log { source(src); filter(f_iptables); destination(d_iptables); };
On top of that you could disable logging of some servers like samba, minidlna and so on.
I don’t do that because I want to have these logs but to do so set the log path in the config files to /dev/null
Ich habe heute ein wenig in verschiedenen Online Shops gestöbert, auf der Suche nach neuen kleinen Gadgets, Klamotten oder was man sonst so finden kann. Ich bin irgendwann durch Zufall auf die einen anscheinend recht neuen Berliner Shop namens Dufte Berliner Produkte gestoßen, welcher sich auf den Verkauf von Berlin Design Produkten spezialisiert hat. Mich verwunderte eine Searchbar, in der zusätzlich Rakuten.de stand. Bisher hab ich das nur auf asiatischen Websites bemerkt. Aber nun scheinen schon deutsche Shops mit Rakuten.de zu kooperieren. Zeit sich das ganze mal etwas genauer anzugucken!

Rakuten ist ein aus Japan kommender Online Shop, welcher durch ein Netzwerk aus Tausenden Shops ein riesiges Sortiment hat und sich somit also eigentlich als Alternative zu Ebay oder Amazon platziert. Weltweit zählt es wohl zu den zehn größten Internetunternehmen, ich muss jedoch leider gestehen, es bisher nicht wirklich gekannt zu haben Wenn man sich ein wenig weiter mit Rakuten beschäftigt, stellt man fest, dass es aber anscheinend die erste größere Markplatzalternative zu Amazon werden könnte. Unterschied ist hier, dass sich jeder Shopbetreiber sein eigenes Layout basteln kann. Bei Amazon bekommt man häufig nicht mit, wenn man von einem Marktplatzhändler bestellt, da dies nur klein geschrieben dort steht, bei Tradoria bzw. Rakuten ist das anders.
Das bietet natürlich einen riesigen Vorteil für die Nutzer des Shopsystems, weil diese Ihre eigene Corporate Identity aufbauen können, man muss jedoch auch den Nachteil für das Shopssystem selber sehen. Wenn man in Konkurrenz zu einem Global Player, wie Amazon tritt, welcher alleine in Deutschland einen Umsatz von 6,8 Millionen Euro erwirtschaftete und damit ein Viertel des gesamten Versandhandels einnimmt, sollte man für so viel Aufmerksamkeit wie möglich sorgen. Ich habe nämlich etwas weiter recherchiert und festgestellt, dass diese Toolbar von Rakuten sogar erst seit Beginn des Jahres durch die Shops eingebunden werden muss und somit in den vergangenen Jahren ein starker Bekanntheitsverlust zu verzeichnen sein müsste. Rakuten zeigt sich in Pressemitteilungen optimistisch, Amazon und Ebay Konkurrenz machen zu können.
Aus dem fernen Osten kommen immer mehr Alternativen… ich bin gespannt!
Konkurrenz kann nie Schaden und sorgt meist für neue Innovationen.
Vorallem wird Rakuten vielleicht dafür sorgen, dass Produkte aus fernost leichter für uns zu beschaffen sind.
Wie das ganze ausgehen wird, wird, wird die Zukunft zeigen.
Updated: [03.05.2015] Sync some performance settings with my own personal settings, added a link to some more performance tips (see bottom).
Note: Check this article if you want to install arch on your pogoplug.
Samba 4 is out now
So I’ll make this tutorial for Samba 4 because it seems to be slightly faster.
This article will tell you how to install it on your PogoplugV2 or another PlugPC.
Should be pretty much the same for all arch installations.
Samba 3 is going to be removed once Samba 4 is installed.
Your old config will be saved to /etc/samba/smb.conf.pacorig
Installation of Samba 4 is pretty easy.
pacman -Sy samba
Now enable the services.
systemctl enable smbd nmbd
If you want to create shares for multiple users you have to create new Unix user and add this one to samba as well.
To make it clean we will create a group called “samba”.
groupadd samba
Now we can add a new user to this group. This user “fabian” is not able to login (-s /sbin/nologin) for security purposes.
useradd -m -g samba -s /sbin/nologin fabian
To use this user in samba shares you have to add it to samba
pdbedit -a -u fabian
We are ready to configure our samba shares.
At the beginning configure
To do so edit /etc/samba/smb.conf
nano /etc/samba/smb.conf
Here is an example configuration.
You have to edit the Share definitions below so it fits your setup.
[global]
   workgroup = WORKGROUP
   server string = POGOPLUG
   netbios name = POGOPLUG
   # hosts allow = 192.168.0.
   printcap name = /dev/null
   load printers = no
   disable spoolss = yes
   printing = bsd
   show add printer wizard = no
   print notify backchannel = no
   log file = /var/log/samba/log.%m
   max log size = 50
   security = user
   dns proxy = no
   # For public share without login
   map to guest = Bad User

   # Android bugix for reading files (samba4 bug see: https://bugzilla.samba.org/show_bug.cgi?id=9706)
   unix extensions = false

   # Fix for file batch copy issues (see: http://archlinuxarm.org/forum/viewtopic.php?f=18&t=4864)
   oplocks = no
   level2 oplocks = no

   # Some Tuning (See Optimize Performance)
   socket options = TCP_NODELAY IPTOS_LOWDELAY SO_RCVBUF=131072 SO_SNDBUF=131072
   write cache size = 262144
   # sendfile will interrupt data transfer :/ (but cpu usage is less) - seems to be fixed now (03.05.2015)
   use sendfile = true
   getwd cache = yes
   min receivefile size = 16384
   max xmit = 65536
   # Global security
   public = yes

#============================ Share Definitions ==============================

# Public, read only
[Videos]
        comment = Videos for all
        read only = yes
        # use this only for read only shares!
        fake oplocks = yes
        path = /media/zincobi/Videos

# Public, writeable
[Abrechnungen]
        comment = Abrechnungen
        read only = no
        writeable = yes
        path = /media/zincobi/Abrechnungen

# whole HDD, only for fabian
[zincobi]
        comment = Fabians share
        public = no
        valid users = fabian
        read only = no
        writeable = yes
        path = /media/zincobi
The stock performance of samba isn’t that great. Especially with NTFS.
But there are some parameters which will increase Samba performance significantly.
Add all these settings to the global section in your smb.conf file.
socket options = TCP_NODELAY IPTOS_LOWDELAY SO_RCVBUF=131072 SO_SNDBUF=131072
The main problem for slow file transfer speeds is NTFS, because NTFS needs much CPU on linux.
Nevertheless there are 2 options which will boost the speed:
write cache size
If this integer parameter is set to non-zero value, Samba will create an in-memory cache for each oplocked file (it does not do this for non-oplocked files). All writes that the client does not request to be flushed directly to disk will be stored in this cache if possible. The cache is flushed onto disk when a write comes in whose offset would not fit into the cache or when the file is closed by the client. Reads for the file are also served from this cache if the data is stored within it.
This cache allows Samba to batch client writes into a more efficient write size for RAID disks (i.e. writes may be tuned to be the RAID stripe size) and can improve performance on systems where the disk subsystem is a bottleneck but there is free memory for userspace programs.
The integer parameter specifies the size of this cache (per oplocked file) in bytes.
Default: write cache size = 0
Example: write cache size = 262144 # for a 256k cache size per file
Some example values are:
write cache size = 262144
(262144 = 256KB – you should test some values it’s pretty memory intensive)
Don’t forget to start the samba services or reboot:
systemctl start smbd nmbd
For some additonal performance tips check this blogpost: https://linuxengineering.wordpress.com/2014/08/03/performance-tuning-with-pogoplug-v4/
My friend x23b5 has an Amazon Kindle and wants to read daily newspapers each morning.
Time for a cron job on my Pogoplug to send some newspapers to this Kindle
There is a pretty cool package called calibre.
It can convert online newspapers to ebook specific files and send it via email to your eBook Reader.
Install calibre
pacman -Sy calibre
Calibre uses recipes to fetch news and convert those to ebook files like .mobi or .epub.
You can list all available recipes with the following command:
ebook-convert --list-recipes
Note: It’s a good idea to create a new email for this task because your password will be saved in plain text. Use a freemailer or create a new user on your own mailserver.
Create the following file in /usr/local/bin/calibre-cron and replace all variables and recipes with yours.
I used another usb stick (cacheStick) to save the temp files because I want to protect my arch linux stick.
To change the output format just change the file extension.
nano /usr/local/bin/calibre-cron
#!/bin/bash

TEMPPATH=/media/cacheStick/calibre/
SERVER_ADDRESS=smtp.mailserver.com
USERNAME=myusername
PASSWORD=mypassword
FROM_EMAIL=ebook@mailserver.com
TO_EMAIL=testuser@kindle.com

# Netzpolitik
ebook-convert "Netzpolitik.recipe" ${TEMPPATH}netzpolitik.mobi
calibre-smtp -a ${TEMPPATH}netzpolitik.mobi -s "Netzpolitik" -r $SERVER_ADDRESS -u $USERNAME -p $PASSWORD $FROM_EMAIL $TO_EMAIL "Netzpolitik"

# Heise
ebook-convert "Heise-online.recipe" ${TEMPPATH}heise.mobi
calibre-smtp -a ${TEMPPATH}heise.mobi -s "Heise" -r $SERVER_ADDRESS -u $USERNAME -p $PASSWORD $FROM_EMAIL $TO_EMAIL "Heise"

# Berliner Zeitung
ebook-convert "Berliner Zeitung.recipe" ${TEMPPATH}bz.mobi
calibre-smtp -a ${TEMPPATH}bz.mobi -s "Berliner Zeitung" -r $SERVER_ADDRESS -u $USERNAME -p $PASSWORD $FROM_EMAIL $TO_EMAIL "Berliner Zeitung"
Make it executable:
chmod u+x /usr/local/bin/calibre-cron
Execute it and check whether it works.
Now we have to create a cron job to execute this script each morning.
Execute this command before you edit your crontab file.
export EDITOR="/usr/bin/nano"
Edit your crontab file:
crontab -e
# daily at 5:00
0 5 * * *       /usr/local/bin/calibre-cron > /dev/null 2>&1
“> /dev/null 2>&1” because I don’t need any email or log output.
Now enable cron service:
systemctl enable cronie
systemctl start cronie
Calibre is pretty memory and cpu intensive and takes pretty long! You should run it overnight otherwise your plug pc will be very slow.
How it looks like:

Here are fresh builds of Cyanogenmod 10.2 for Google Nexus 4 (mako)
Download
ROM: http://obihoernchen.net/downloads/?dir=Nexus+4+CM+10.2
Gapps: http://obihoernchen.net/downloads/Gapps/pa_gapps-full-4.3-20130808-signed.zip
You can find Modems and Bootloaders there as well.
Update #01: New Build: 11.08.2013 ~ 13:30 – Changelog
Update #02: New Build: 12.08.2013 ~ 02:15 – Changelog
Update #03: New Build: 12.08.2013 V2 ~ 14:00 – Changelog
Update #04: New Build: 13.08.2013 ~ 09:30 – Changelog
Update #05: New Build: 14.08.2013 ~ 08:30 – Changelog


My Nexus 4 was really slow because the sequential write speed of the filesystem was around 3MB/s. Random write speed was nearly zero…
Fstrim (or LagFix) didn’t help at all  I think a lot of you already know about F2FS the flash friendly file system from Samsung. Benchmarks show that it really boost I/O Performance. So time for me to try it and see whether it will fix my performance problems.
F2FS (Flash-Friendly File System) is a flash file system created by Kim Jaegeuk at Samsung for the Linux operating system kernel. The motive for F2FS was to build a file system that from the start takes into account the characteristics of NAND flash memory-based storage devices (such as solid-state disks, eMMC, and SD cards), which are widely used in computer systems ranging from mobile devices to servers.
You can format your /data and /cache partition to F2FS. Normally you’ll loose all data in this process and have to reinstall everything. But this small howto will show you how to recover your data so you can continue where you left off. Just like a “dirty” ROM flash.
Note: In my mind it doesn’t make much sense to format/system to F2FS because you would need a modified ROM to use it. Everytime you update your ROM you would have to modify it to use /system as F2FS. On top of that there shouldn’t be a real performance gain with a F2FS /system partition because it’s read-only. And reading operations are fast with ext4, too. The difference is non-existent or very low. In my humble opinion the so called All-F2FS is pretty useless.
This following method should work with all devices which have FSFS compatible TWRP recovery, rom and kernel available.
Now your Android device should fly again
Just found some time to update the theme of this page and improve the whole menu and navigation a bit.
Hope it looks better again
Nearly 3 years ago I have bought myself a PogoplugV2 (see Post). It is still an awesome device for this price and worked without any issue the whole time.
However it is time for an upgrade. USB 2.0 was a little bit too slow for me (~30MB/s). In addition I have a lot of external USB 3.0 HDDs and it is time to use their full potential. So there are 4 key points a device needs to become my next NAS (Network-attached storage) and home server system:
After a bit of research I have bought an ODROID-XU4.
Let’s look at the specs:
I do not need the GPU and display output but whatever… the price is quite good for this performance. It is less expensive in US than it is in germany. But that is always the case
I am using a microSD Card for OS because eMMC is quite expensive. Boot times and program loading times are not that important my use case.
With two additional 4 port active USB 3.0 hubs I have 8 USB 3.0 ports and 1 USB 2.0 port. At the moment 5 disks are connected with a total of 7.5 TB storage.
Connecting a 2 TB disk to each USB 3.0 port would be 16 TB storage which should be good enough for some time.
The ODROID-XU4 SOC is the same as its predecessor ODROID-XU3. That is why they share a common kernel and os images are compatible.
Nevertheless Exynos5422 SOC is not fully integrated in mainline kernel yet. That is why you have to use a custom kernel from hardkernel. But that is not a big issue because there a quite a few OS choices with the custom kernel like Android (ofc pretty useless for NAS), Ubuntu 15.04, Arch Linux, Fedora, Kali Linux, …
Also I really like Arch Linux I have chosen a different path this time. There is OpenMediaVault (OMV) for some Odroids. I thought hey let’s give it a try the web interface looks quite nice.
After a few days I can say I really like it. The web interface is really good and looks modern.
OMV is running on Debian Wheezy 7.9.
Download OpenMediaVault Image from: http://sourceforge.net/projects/openmediavault/files/Odroid-XU3_XU4/
Extract the downloaded image
gunzip -d omv_2.1.1_xu3_xu4.img.gz
Search for the path of your microSD Card with lsblk
or
sudo fdisk -l
Write the image to your microSD card with the following command:
sudo dd if=omv_2.1.1_xu3_xu4.img of=/dev/<Your_SD> bs=4096
Insert your microSD card and power your Odroid.
Then you can login via SSH or web interface:
SSH
username: root
password: odroid
Web interface
username: admin
password: openmediavault
I will not go into detail on how to configure stuff in the web interface because that is really easy and straightforward. I will focus on optimizing performance and adding a few neat features.
Connect to your Odroid via SSH with default login credentials (see above).
Afterwards change your root password with
passwd
You should change your web interface password, too.
Because we will use the shell for quite some time let’s add some color to it:
vi ~/.bashrc
and comment out the following lines:
# You may uncomment the following lines if you want `ls' to be colorized:
export LS_OPTIONS='--color=auto'
eval "`dircolors`"
alias ls='ls $LS_OPTIONS'
alias ll='ls $LS_OPTIONS -l'
alias l='ls $LS_OPTIONS -lA'
vi /etc/vim/vimrcand comment out the following line:
syntax on
and some more set’s from the bottom of the file as you like.
Note: If you are not familiar with
vi/vimyou can use
nanoto edit all files.
Performance with default settings was really bad. Disk read and write was around 30MB/s to ext4 and SSH was laggy. After a few minutes I have found the issue. Per default OMV sets the conservative governor. This may work well with x86 CPUs or other ARM CPUs but with Odroid it is a pain.
In the web interface under “Power Management” is an option called “Monitoring – Specifies whether to monitor the system status and select the most appropriate CPU level.” This sounds quite good, problem is this option sets the cpu governor to conservative. Conservative governor with default settings works really bad on Odroid in combination with I/O.
Disabling this option sets governor to performance. All 8 cores at max clock speed the whole time produce quite a bit of heat (fan spinning a lot) and it is not really energy efficient.
But no problem we can change the governor to ondemand and with a little bit tuning your Odroid will fly. The following settings will replace conservative with ondemand governor if you enable the Power Management option.
vi /etc/default/openmediavaultand append the following lines to this file:
# Ondemand Scheduler
OMV_CPUFREQUTILS_GOVERNOR="ondemand"
Then regenerate the config with
omv-mkconf cpufrequtils
Note: There seems to be a bug in OpenMediaVault. After disabling Power Management and enabling it again it does not change cpu governor anymore. To fix this do the following:
update-rc.d cpufrequtils defaults
I did a few benchmarks and this showed I/O performance (my main focus) depends a lot on the cpu frequency. Therefore we further have to tune ondemand governor to get full I/O throughput. To do so do the following:
apt-get install sysfsutils
vi /etc/sysfs.conf
Copy the following to this file
# cpu0 sets cpu[0-3], cpu4 sets cpu[4-7]
devices/system/cpu/cpu0/cpufreq/ondemand/io_is_busy = 1
devices/system/cpu/cpu4/cpufreq/ondemand/io_is_busy = 1
devices/system/cpu/cpu0/cpufreq/ondemand/sampling_down_factor = 20
devices/system/cpu/cpu4/cpufreq/ondemand/sampling_down_factor = 20
devices/system/cpu/cpu0/cpufreq/ondemand/up_threshold = 80
devices/system/cpu/cpu4/cpufreq/ondemand/up_threshold = 80
Afterwards change to ondemand governor and activate these values with
cpufreq-set -g ondemand -c 0
cpufreq-set -g ondemand -c 4
service sysfsutils start
I did benchmarks with all these settings and for me this is the sweet spot. Nearly same performance as performance governor but lower frequency and less power consumption when idle.
Some explanation of all 3 settings:
sampling_down_factor: this parameter controls the rate at which the kernel makes a decision on when to decrease the frequency while running at top speed. When set to 1 (the default) decisions to reevaluate load are made at the same interval regardless of current clock speed. But when set to greater than 1 (e.g. 100) it acts as a multiplier for the scheduling interval for reevaluating load when the CPU is at its top speed due to high load. This improves performance by reducing the overhead of load evaluation and helping the CPU stay at its top speed when truly busy, rather than shifting back and forth in speed. This tunable has no effect on behavior at lower speeds/lower CPU loads.
up_threshold: defines what the average CPU usage between the samplings of ‘sampling_rate’ needs to be for the kernel to make a decision on whether it should increase the frequency. For example when it is set to its default value of ’95’ it means that between the checking intervals the CPU needs to be on average more than 95% in use to then decide that the CPU frequency needs to be increased.
io_is_busy: if 1 waiting for I/O will increase the calculated cpu usage. The governor will calculate iowait as busy and not idle time. Thus cpu will reach higher frequencies faster with I/O load.
Besides the ondemand governor we will add the big_writes mount option to all NTFS mounts. In addition we will add noatime.
big_writes: this option prevents fuse from splitting write buffers into 4K chunks, enabling big write buffers to be transferred from the application in a single step (up to some system limit, generally 128K bytes).
noatime this option disables inode access time updates which can speed up file operations and prevent sleeping (notebook) disks spinning up too often thus saving energy and disk lifetime.
vi /etc/default/openmediavaultand append the following
# Optimize NTFS Performance
OMV_FSTAB_MNTOPS_NTFS="defaults,nofail,noexec,noatime,big_writes"
Then you have to unmount, apply, mount, apply all your NTFS volumes in the web interface.
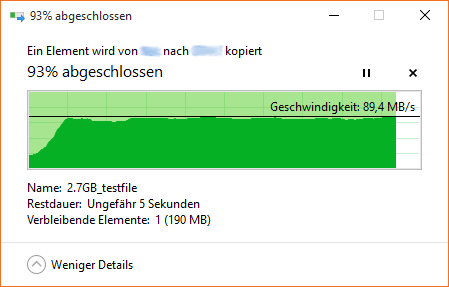
With default mount options you get around 16 MB/s write. With big_writes you get up to 62 MB/s write. See this comparison below:
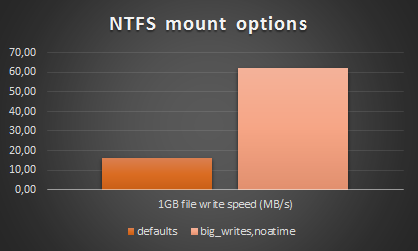
This looks fairly fast but keep in mind NTFS is very cpu intensive on such a system. Therefore real network throughput via samba (which is cpu heavy as well) is way less compared to a native linux filesystem. I tested this disk with samba and measured only ~30MB/s read and write speeds. This is considerably less than a native linux filesystem (see Samba benchmarks).
If you want to get full performance you have to use a native linux filesystem like ext4 or xfs. You really should!
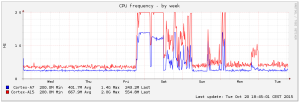
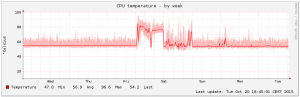
I really like the monitoring setup of OMV with rrdtool. Nevertheless I miss 2 graphs which I am interested in. It would be nice to have CPU frequency and CPU temperature graphs, therefore I extended the existing monitoring plugin.
Monitoring cpu frequency is no big deal because there is a native collectd plugin for CPU frequency. For CPU temperature we have to write our own collectd plugin which looks like this:
#!/bin/sh

# Read CPU temperature of ODROID-XU3/4
# There are 2 sensors available:
# /sys/devices/virtual/thermal/thermal_zone0/temp
# /sys/devices/10060000.tmu/temp

HOSTNAME="${COLLECTD_HOSTNAME:-localhost}"
INTERVAL="${COLLECTD_INTERVAL:-60}"

while sleep "$INTERVAL"; do
	VALUE="$(($(cat /sys/devices/virtual/thermal/thermal_zone0/temp)/1000))"
	if [ $? -ne 0 ]; then
		VALUE="U"
	fi
	echo "PUTVAL \"$HOSTNAME/temperature/temperature-cpu\" interval=$INTERVAL N:$VALUE"
done
In addition to the script above you have to create new collectd configs and additional tabs in the web interface. I have done all that and uploaded the full sourcecode (including the script above) to GitHub: https://github.com/Obihoernchen/openmediavault-monitoring-odroid-xu4
Install these CPU frequency and temperature monitoring plugins with the following commands:
cd /tmp
wget https://github.com/Obihoernchen/openmediavault-monitoring-odroid-xu4/archive/master.zip
unzip master.zip
cd openmediavault-monitoring-odroid-xu4-master
cp -R usr/* /usr
cp -R var/* /var
rm -r /tmp/openmediavault-monitoring-odroid-xu4-master

chmod +x /usr/local/bin/cputemp /usr/share/openmediavault/mkconf/collectd.d/cpu{freq,temp}
omv-mkconf collectd

chown openmediavault:openmediavault /var/www/openmediavault/js/omv/module/admin/diagnostic/system/plugin/Cpu{Temperature,Frequency}.js
chmod 644 /var/www/openmediavault/js/omv/module/admin/diagnostic/system/plugin/Cpu{Temperature,Frequency}.js

source /usr/share/openmediavault/scripts/helper-functions && omv_purge_internal_cache
The default diagrams are a little small for my taste, that is why I have increased the size a bit:
vi /etc/default/openmediavaultand add the following to this file
# RRDTool graph width and height
OMV_COLLECTD_RRDTOOL_GRAPH_WIDTH=800
OMV_COLLECTD_RRDTOOL_GRAPH_HEIGHT=200
Afterwards update OMV’s config files with
omv-mkconf collectd
omv-mkconf rrdcached
Afterwards you will have 2 new tabs which show graphs like these:
Finally
rebootto see if everything is working as expected.
All benchmarks were done with performance governor to get consistent results.
I have several USB disks connected to my Odroid. Expect one disk all are 2.5″ USB 3.0 disks. All USB 3.0 disks are connected to two active USB 3.0 hubs. The USB 2.0 disk is connected to the USB 2.0 port.
In the following you can find hdparm read and dd read/write benchmarks for all connected disks. As you can see the performance is quite good and should be near the maximum the disks can handle.
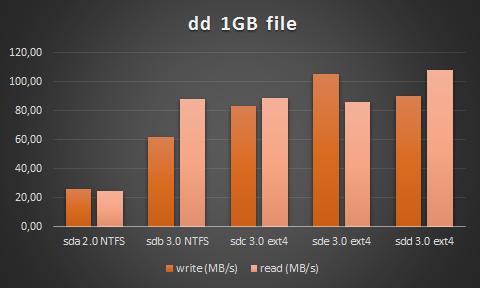
### Overview of HDDs ###
sda	USB 2.0		NTFS w big_writes	WD Elements 2,5" - 500GB
sdb	USB 3.0		NTFS w big_writes	Toshiba Canvio Basics - 2TB
sdc	USB 3.0		ext4			WD Elements 2,5" - 2TB
sdd	USB 3.0		ext4			Toshiba Stor.E Basics - 2TB
sde	USB 3.0		ext4			CnMemory Zinc 2,5" - 1TB


### hdparm results ###
hdparm -Tt /dev/sda
/dev/sda:
 Timing cached reads:   1846 MB in  2.00 seconds = 924.41 MB/sec
 Timing buffered disk reads:  74 MB in  3.06 seconds =  24.22 MB/sec

hdparm -Tt /dev/sdb
/dev/sdb:
 Timing cached reads:   1370 MB in  2.00 seconds = 685.57 MB/sec
 Timing buffered disk reads: 240 MB in  3.52 seconds =  68.26 MB/sec

hdparm -Tt /dev/sdc
/dev/sdc:
 Timing cached reads:   1898 MB in  2.00 seconds = 950.68 MB/sec
 Timing buffered disk reads: 306 MB in  3.01 seconds = 101.61 MB/sec

hdparm -Tt /dev/sdd
/dev/sdd:
 Timing cached reads:   1960 MB in  2.00 seconds = 981.68 MB/sec
 Timing buffered disk reads: 248 MB in  3.01 seconds =  82.50 MB/sec

hdparm -Tt /dev/sde

/dev/sde:
 Timing cached reads:   2024 MB in  2.00 seconds = 1013.57 MB/sec
 Timing buffered disk reads: 318 MB in  3.02 seconds = 105.41 MB/sec


### dd results ###

# sda
dd if=/dev/zero of=tempfile bs=1M count=1024 conv=fdatasync,notrunc
1024+0 records in
1024+0 records out
1073741824 bytes (1.1 GB) copied, 41.4705 s, 25.9 MB/s

echo 3 > /proc/sys/vm/drop_caches && dd if=tempfile of=/dev/null bs=1M count=1024
1024+0 records in
1024+0 records out
1073741824 bytes (1.1 GB) copied, 44.1483 s, 24.3 MB/s

# sdb
dd if=/dev/zero of=tempfile bs=1M count=1024 conv=fdatasync,notrunc
1024+0 records in
1024+0 records out
1073741824 bytes (1.1 GB) copied, 17.609 s, 61.0 MB/s

echo 3 > /proc/sys/vm/drop_caches && dd if=tempfile of=/dev/null bs=1M count=1024
1024+0 records in
1024+0 records out
1073741824 bytes (1.1 GB) copied, 12.2101 s, 87.9 MB/s

# sdc
dd if=/dev/zero of=tempfile bs=1M count=1024 conv=fdatasync,notrunc
1024+0 records in
1024+0 records out
1073741824 bytes (1.1 GB) copied, 12.9431 s, 83.0 MB/s

echo 3 > /proc/sys/vm/drop_caches && dd if=tempfile of=/dev/null bs=1M count=1024
1024+0 records in
1024+0 records out
1073741824 bytes (1.1 GB) copied, 12.1161 s, 88.6 MB/s

# sdd
dd if=/dev/zero of=tempfile bs=1M count=1024 conv=fdatasync,notrunc
1024+0 records in
1024+0 records out
1073741824 bytes (1.1 GB) copied, 10.2158 s, 105 MB/s

echo 3 > /proc/sys/vm/drop_caches && dd if=tempfile of=/dev/null bs=1M count=1024
1024+0 records in
1024+0 records out
1073741824 bytes (1.1 GB) copied, 12.531 s, 85.7 MB/s

# sde
dd if=/dev/zero of=tempfile bs=1M count=1024 conv=fdatasync,notrunc
1024+0 records in
1024+0 records out
1073741824 bytes (1.1 GB) copied, 11.9007 s, 90.2 MB/s

echo 3 > /proc/sys/vm/drop_caches && dd if=tempfile of=/dev/null bs=1M count=1024
1024+0 records in
1024+0 records out
1073741824 bytes (1.1 GB) copied, 9.95148 s, 108 MB/s
All network settings are default OMV/debian settings.
Receive: 832 Mbit/s = 104 MByte/s
Send: 896 Mbit/s = 112 MByte/s
I am satisfied with these results as it is close to the theoretical maximum of 1Gbit/s.
# Server on Odroid
iperf -s -N

# Client on Thinkpad T430
# bidirectional test individually
iperf -c 192.168.0.2 -i 2 -r
------------------------------------------------------------
Server listening on TCP port 5001
TCP window size: 85.3 KByte (default)
------------------------------------------------------------
------------------------------------------------------------
Client connecting to 192.168.0.2, TCP port 5001
TCP window size:  323 KByte (default)
------------------------------------------------------------
[  5] local 192.168.0.118 port 56182 connected with 192.168.0.2 port 5001
[ ID] Interval       Transfer     Bandwidth
[  5]  0.0- 2.0 sec   200 MBytes   838 Mbits/sec
[  5]  2.0- 4.0 sec   198 MBytes   831 Mbits/sec
[  5]  4.0- 6.0 sec   198 MBytes   829 Mbits/sec
[  5]  6.0- 8.0 sec   198 MBytes   831 Mbits/sec
[  5]  8.0-10.0 sec   200 MBytes   838 Mbits/sec
[  5]  0.0-10.0 sec   994 MBytes   832 Mbits/sec
[  4] local 192.168.0.118 port 5001 connected with 192.168.0.2 port 44967
[  4]  0.0- 2.0 sec   207 MBytes   868 Mbits/sec
[  4]  2.0- 4.0 sec   215 MBytes   902 Mbits/sec
[  4]  4.0- 6.0 sec   216 MBytes   905 Mbits/sec
[  4]  6.0- 8.0 sec   214 MBytes   896 Mbits/sec
[  4]  8.0-10.0 sec   216 MBytes   907 Mbits/sec
[  4]  0.0-10.0 sec  1.04 GBytes   896 Mbits/sec


# bidirectional test simultaneously
iperf -c 192.168.0.2 -i 2 -d
------------------------------------------------------------
Server listening on TCP port 5001
TCP window size: 85.3 KByte (default)
------------------------------------------------------------
------------------------------------------------------------
Client connecting to 192.168.0.2, TCP port 5001
TCP window size:  289 KByte (default)
------------------------------------------------------------
[  5] local 192.168.0.118 port 56187 connected with 192.168.0.2 port 5001
[  4] local 192.168.0.118 port 5001 connected with 192.168.0.2 port 44808
[ ID] Interval       Transfer     Bandwidth
[  4]  0.0- 2.0 sec   125 MBytes   523 Mbits/sec
[  5]  0.0- 2.0 sec   100 MBytes   420 Mbits/sec
[  5]  2.0- 4.0 sec   109 MBytes   456 Mbits/sec
[  4]  2.0- 4.0 sec   110 MBytes   462 Mbits/sec
[  4]  4.0- 6.0 sec   112 MBytes   470 Mbits/sec
[  5]  4.0- 6.0 sec   108 MBytes   454 Mbits/sec
[  4]  6.0- 8.0 sec   118 MBytes   496 Mbits/sec
[  5]  6.0- 8.0 sec   105 MBytes   441 Mbits/sec
[  5]  8.0-10.0 sec   104 MBytes   436 Mbits/sec
[  4]  8.0-10.0 sec   119 MBytes   501 Mbits/sec
[  5]  0.0-10.0 sec   526 MBytes   441 Mbits/sec
[  4]  0.0-10.0 sec   587 MBytes   490 Mbits/sec
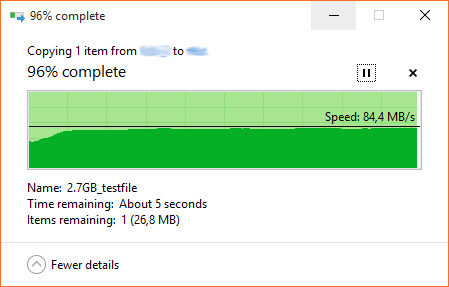
Disk and network speed looks fine. Because there are windows machines in my network I have to use samba to share files. As you can see samba speed is quite good and very stable.
Writing 2.7 GB test file to Odroid (USB 3.0 ext4 disk)
Reading 2.7 GB test file from Odroid (USB 3.0 ext4 disk)
If you have any additional questions feel free to ask
I will try to update this post regularly with new optimizations etc.
Per default the Mali-T628 GPU inside the ODROID-XU4 will run at maximum speed (600MHz) the whole time.
This doesn’t consume that much energy if there is no load on the GPU but nevertheless you can tune this a little bit if you don’t need the GPU at all.
Your kernel needs the following commit: mali: restore sysfs entries
Newer 3.10 ODROID-XU4 kernels should have this activated. I tested this with my own custom build kernel. You can grab it here. Source.
To lock the GPU frequency to the lowest frequency possible (177MHz) do the following. This will automatically lower the voltage as well (see
cat /sys/devices/11800000.mali/volbefore and after the change).
apt-get install sysfsutils
vi /etc/sysfs.conf

---
# lower mali gpu clock to min
devices/11800000.mali/dvfs_max_lock = 177
---

service sysfsutils start
I just moved the site to my VPS and enabled HTTPS for everything. Furthermore I upgraded to PHP7 and HTTP/2.
On top of that I fixed a few things here and there so the site should load much faster.
If you encounter any problems, please let me know in the comments below.
Have fun!
It’s time for another small blog about the ODROID-XU4.
This is just a quick tip to improve your network and USB performance even more. It will optimize your hardware interrupts (IRQ) affinity on your ODROID-XU4.
This guide is for the 3.10.y kernel and debian 8. For other kernel versions the interrupts may have different numbers.
Whenever a piece of hardware, such as disk controller or ethernet card, needs attention from the CPU, it throws an interrupt. The interrupt tells the CPU that something has happened and that the CPU should drop what it’s doing to handle the event. In order to prevent multiple devices from sending the same interrupts, the IRQ system was established where each device in a computer system is assigned its own special IRQ so that its interrupts are unique.Starting with the 2.4 kernel, Linux has gained the ability to assign certain IRQs to specific processors (or groups of processors). This is known as SMP IRQ affinity, and it allows you control how your system will respond to various hardware events. It allows you to restrict or repartition the workload that you server must do so that it can more efficiently do it’s job.
Source
It’s always a good idea to spread your interrupts evenly across all CPUs. In my case I want to achieve the best performance possible. Therefore I want to use the faster A15 CPU cluster for all important interrupt handling.
There are basically 3 different interrupts on a headless ODROID-XU4 server you should take into consideration:
Per default all 3 interrupts for these devices are handled by CPU0, which is a A7 core as you can see in the output below:
lscpu -e
CPU SOCKET CORE ONLINE MAXMHZ    MINMHZ
0   0      0    yes    1400.0000 200.0000
1   0      1    yes    1400.0000 200.0000
2   0      2    yes    1400.0000 200.0000
3   0      3    yes    1400.0000 200.0000
4   1      4    yes    2000.0000 200.0000
5   1      5    yes    2000.0000 200.0000
6   1      6    yes    2000.0000 200.0000
7   1      7    yes    2000.0000 200.0000

grep -E 'CPU0|usb' /proc/interrupts
           CPU0       CPU1       CPU2       CPU3       CPU4       CPU5       CPU6       CPU7
103:          1          0          0          0          0          0          0          0       GIC  ehci_hcd:usb1, ohci_hcd:usb2
104:      12853          0          0          0          0          0          0          0       GIC  xhci-hcd:usb3
105:       7489          0          0          0          0          0          0          0       GIC  xhci-hcd:usb5
First of all make sure that automatic IRQ balancing is disabled:
systemctl disable irqbalance
For debian add the following to your
/etc/rc.localfile to pin the interrupt handling to A15 cores 4-6 (CPU4-6):
# Move USB and network irqs to A15 CPU cluster
# usb2
echo 6 > /proc/irq/103/smp_affinity_list
# usb3
echo 5 > /proc/irq/104/smp_affinity_list
# network (usb3)
echo 4 > /proc/irq/105/smp_affinity_list
After a reboot and some file transfer you should see something like this:
grep -E 'CPU0|usb' /proc/interrupts
           CPU0       CPU1       CPU2       CPU3       CPU4       CPU5       CPU6       CPU7
103:          1          0          0          0          0          0          0          0       GIC  ehci_hcd:usb1, ohci_hcd:usb2
104:       8355          0          0          0          0     249689          0          0       GIC  xhci-hcd:usb3
105:        436          0          0          0    4396187          0          0          0       GIC  xhci-hcd:usb5
Note the numbers for CPU4 and CPU5. CPU0 handled some initial interrupts during the boot, because rc.local isn’t executed immediately.
Tuning without measuring performance before and afterwards is useless. So, here are some iperf results:
# without irq tuning
iperf -c 192.168.0.2 -i 2 -r
------------------------------------------------------------
Server listening on TCP port 5001
TCP window size: 85.3 KByte (default)
------------------------------------------------------------
------------------------------------------------------------
Client connecting to 192.168.0.2, TCP port 5001
TCP window size: 272 KByte (default)
------------------------------------------------------------
[ 5] local 192.168.0.121 port 57696 connected with 192.168.0.2 port 5001
[ ID] Interval Transfer Bandwidth
[ 5] 0.0- 2.0 sec 198 MBytes 830 Mbits/sec
[ 5] 2.0- 4.0 sec 198 MBytes 830 Mbits/sec
[ 5] 4.0- 6.0 sec 201 MBytes 842 Mbits/sec
[ 5] 6.0- 8.0 sec 199 MBytes 835 Mbits/sec
[ 5] 8.0-10.0 sec 199 MBytes 835 Mbits/sec
[ 5] 0.0-10.0 sec 995 MBytes 834 Mbits/sec
[ 4] local 192.168.0.121 port 5001 connected with 192.168.0.2 port 41073
[ 4] 0.0- 2.0 sec 206 MBytes 865 Mbits/sec
[ 4] 2.0- 4.0 sec 207 MBytes 870 Mbits/sec
[ 4] 4.0- 6.0 sec 210 MBytes 881 Mbits/sec
[ 4] 6.0- 8.0 sec 211 MBytes 883 Mbits/sec
[ 4] 8.0-10.0 sec 210 MBytes 882 Mbits/sec
[ 4] 0.0-10.0 sec 1.02 GBytes 876 Mbits/sec


# with irq tuning
iperf -c 192.168.0.2 -i 2 -r
------------------------------------------------------------
Server listening on TCP port 5001
TCP window size: 85.3 KByte (default)
------------------------------------------------------------
------------------------------------------------------------
Client connecting to 192.168.0.2, TCP port 5001
TCP window size: 289 KByte (default)
------------------------------------------------------------
[ 5] local 192.168.0.121 port 57702 connected with 192.168.0.2 port 5001
[ ID] Interval Transfer Bandwidth
[ 5] 0.0- 2.0 sec 224 MBytes 941 Mbits/sec
[ 5] 2.0- 4.0 sec 223 MBytes 936 Mbits/sec
[ 5] 4.0- 6.0 sec 223 MBytes 935 Mbits/sec
[ 5] 6.0- 8.0 sec 223 MBytes 937 Mbits/sec
[ 5] 8.0-10.0 sec 223 MBytes 934 Mbits/sec
[ 5] 0.0-10.0 sec 1.09 GBytes 936 Mbits/sec
[ 4] local 192.168.0.121 port 5001 connected with 192.168.0.2 port 41076
[ 4] 0.0- 2.0 sec 219 MBytes 920 Mbits/sec
[ 4] 2.0- 4.0 sec 220 MBytes 924 Mbits/sec
[ 4] 4.0- 6.0 sec 220 MBytes 924 Mbits/sec
[ 4] 6.0- 8.0 sec 220 MBytes 924 Mbits/sec
[ 4] 8.0-10.0 sec 220 MBytes 924 Mbits/sec
[ 4] 0.0-10.0 sec 1.08 GBytes 923 Mbits/sec
Up to 100 Mbit/s faster. Not bad for such an easy fix 
This short tutorial will show you how to upgrade a ODROID-XU4 running OpenMediaVault 2 to OpenMediaVault 3.
OMV 3 (Erasmus) uses Debian 8 (Jessie) instead of 7 (Wheezy). So alongside OMV you will get new packages as well.
apt-get update && apt-get upgrade
boot.ini and /etc/fstab.mkdir /media/boot mount /dev/mmcblk0p1 /media/boot
/media/boot/boot.ini and change ro to rw in the setenv line. The line should look like below:setenv bootrootfs "console=tty1 console=ttySAC2,115200n8 root=UUID=<YOUR_ROOTFS_UUID> rootwait rw fsck.repair=yes"
/etc/fstab and add the following above the openmediavault volumes:# UNCONFIGURED FSTAB FOR BASE SYSTEM UUID=<YOUR_ROOTFS_UUID> / ext4 errors=remount-ro,noatime,nodiratime 0 1 # >>> [openmediavault] [...]
omv-release-upgradeand reboot afterwards
wget http://omv-extras.org/openmediavault-omvextrasorg_latest_all3.deb
dpkg -i openmediavault-omvextrasorg_latest_all3.deb
apt-get update
Here are some first impressions of my new ODROID-XU4 CloudShell-2 with a custom blue LED FAN. Some more posts coming soon.
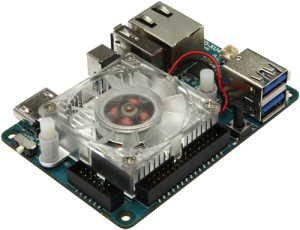


 Perfect for headless servers.


